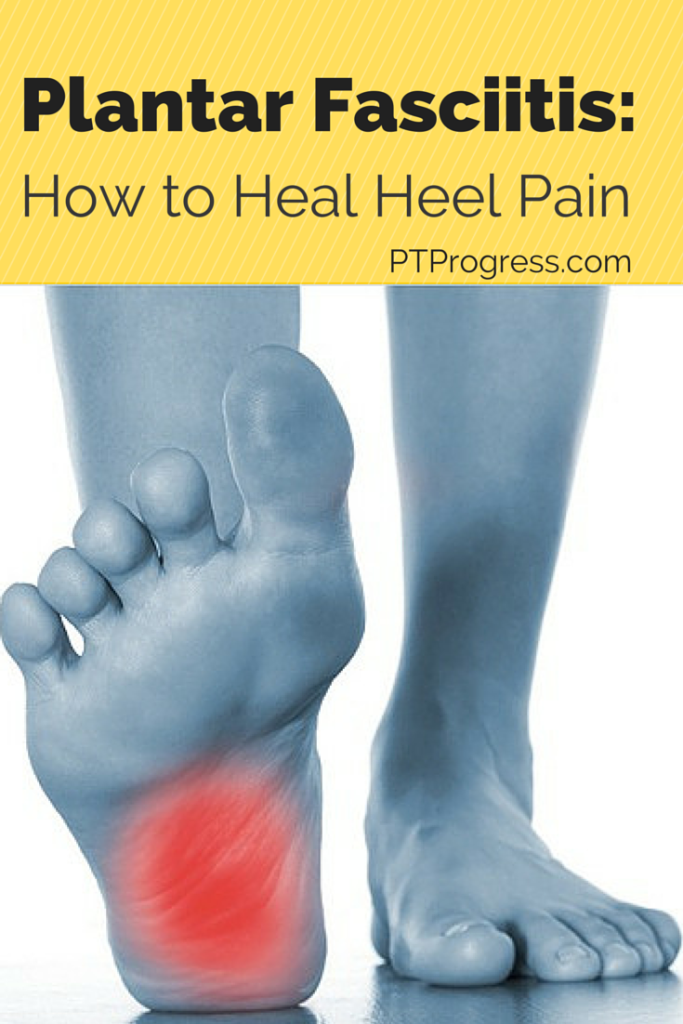
What is Plantar Fasciitis?
Plantar Fasciitis can come on suddenly and last for months. The plantar fascia is a band of tissue that runs from your heel to your toes and supports the arch of your foot. Straining the arch of your foot can lead to heel pain when walking and especially heel pain in the morning.
This article is designed to show you how to get rid of your heel pain without spending hundreds of dollars on special plantar fasciitis shoes or inserts.
Fix Plantar Fasciitis: A Natural Remedy for Heel Pain
There are three basic steps to getting rid of your heel pain for good:
- Proper Support
- Proper Stretching
- Proper Strengthening
This treatment protocol uses all three of these elements together and progresses stretching and strengthening in order to develop the foot’s natural ability to provide support through a well-designed arch.
Just like any other muscle in your body, your foot muscles can be strengthened and provide the support you need. Yes, even if you are ‘flat footed’ or have a pronated foot.
Treatment for Plantar Fasciitis:
1. Proper Support
If you have heel pain in standing, I want you to try something right now: Find a towel or something soft that’s about an inch or two thick. Now put this under your heel while standing. Feels better right?
You’ve probably figured out that wearing flats or flip-flops makes your heel pain worse. That’s because your foot isn’t strong enough to maintain its arch – which is now becoming irritated.
The fix: Find a shoe that has a slightly raised heel.
What Are the Best Shoes For Plantar Fasciitis Heel Pain?
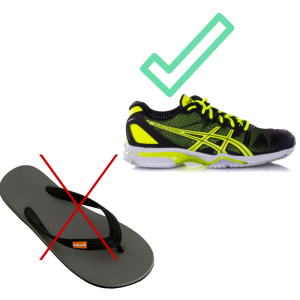 A good example is a tennis shoe or a dress shoe that elevates your heel. Wear these shoes for the next few weeks.
You might also try adding a small heel lift in the back of your shoe – a simple cardboard cutout should work here. Nothing fancy!
Your foot needs support in this stage so be aware of the type of shoes you’re wearing. Shoes that make your pain worse are not going to help you recover.
It might sound like a simple tip, but everything that you do to help relieve your heel pain is working towards healing the irritation in your foot.
Before you go buying special plantar fasciitis socks or shoes, try the cardboard trick and wear a supportive shoe that has a slightly raised heel.
Plantar Fasciitis Taping
I prefer initially taping the arch of a foot when possible because it gives the greatest support for a sustained time. Using an orthotic for plantar fasciitis can be useful when you’re wearing the shoes, but the goal is to support the foot initially and not become dependent on things like orthotics or tape for the rest of your life.
A quick note on tape:
- It’s not meant to be used forever, but can be helpful for 2-3 days while on.
- It may irritate the skin of some people so check your skin.
- It should be removed carefully and remain off skin at least 24 hours.
Those are basic parameters, but read the instructions, follow the manufacturer suggestions and use some common sense!
Tape + stretch + strengthening = a great start to treating heel pain.
Don’t rely just on one part of the equation, you should be stretching and strengthening as well (see Stretching and Strengthening below).
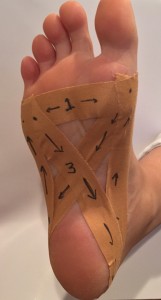
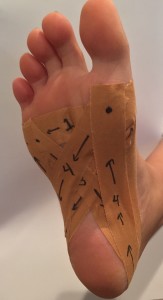
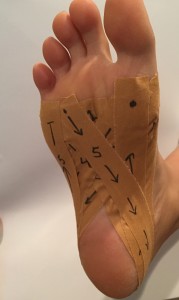
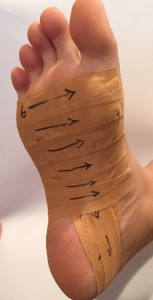
Follow these steps to apply heel tape to yourself. A strong athletic tape should be sufficient. The tape shown below is called LeukoTape and costs around $10 a roll on Amazon.
Instructions for Plantar Fasciitis Taping:
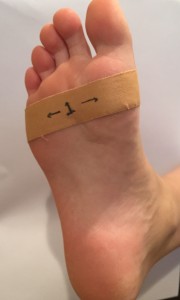
1. Anchor Strip: Position foot in Dorsiflexion (lift foot towards your body). Place an anchor strip across the ball of your foot.
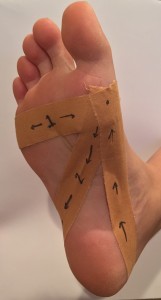
2. Teardrop pattern: Start at the inside of the foot and wrap the tape across the mid foot and loop around the heel, returning to the base of the first metatarsal (big toe).
3. Teardrop pattern: Start next teardrop at the base of the 5th metatarsal (little toe) and wrap across the mid foot and loop around the heel, returning along the outside part of the foot.
4. Overlap the #2 teardrop pattern covering about half of the tape as you make another teardrop to cover more of the foot.
5. Overlap the #3 teardrop pattern covering about half of the tape just like did above. (Alternate this teardrop pattern as needed to cover larger feet.)
6. Support Strips: Start on the outside and pull inside to support the arch and to cover the teardrops. You can also place a finishing piece of tape along edges to keep them from fraying.
Night Splints for Heel Pain
One of the biggest reasons night splints work is because we often sleep with our feet pointed down. This shortens the calf muscles and makes the heel tendon tighter, especially in the morning. (Makes sense why you’re getting those shooting pains when you first get out of bed right?)
If you don’t want to get a night splint, try this:
The fix: Pull the covers off of your feet. Un-tuck the sheets from the bottom of the bed if they’re pulling your feet into a pointed (plantarflexed) position. If you can avoid this stress to your feet at night, you should start to see some progress.
Also, taping your arch can provide a good amount of support to your foot at night so you might not need to spend additional money on a pricey splint.
It’s not that I’m against night splints. They can work great for some people. My goal is to address the things that you can do NOW to fix your heel pain without spending a ton of money.
If you have $20 to spend, then you might try a night splint as it may speed up your recovery.
Treatment for Plantar Fasciitis:
2. Proper Stretching
Have you heard the phrase: No Pain No Gain…. FORGET IT!
Stretching your calf is a key part of relieving your heel pain, but you cannot rush it. Performing a painful ‘hurts so good’ stretch can actually irritate your plantar fascia even more.
The goal of these stretches listed below should be this: a mild stretch. Not painful – just mild. I can’t say this enough.
If you feel a sharp painful stretch, back off of the pressure. You’re in control here.
Seated Towel Calf Stretch
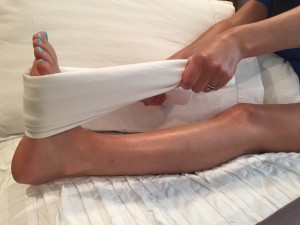 I find that this stretch works best first thing in the morning. Before you even get out of bed, take a sheet or a towel and place it around your foot. Keeping your knee straight (very important!), gently pull on the sheet to stretch your foot towards your body. You should feel a light stretch in the heel and the back of your calf.
This does two things: it introduces light stress to your foot to ease it into full weight bearing, and it stretches your calf muscle and heel cord which are stiff.
Hold this stretch for 30 seconds and repeat 3 times before standing out of bed.
Standing Wall Lunge
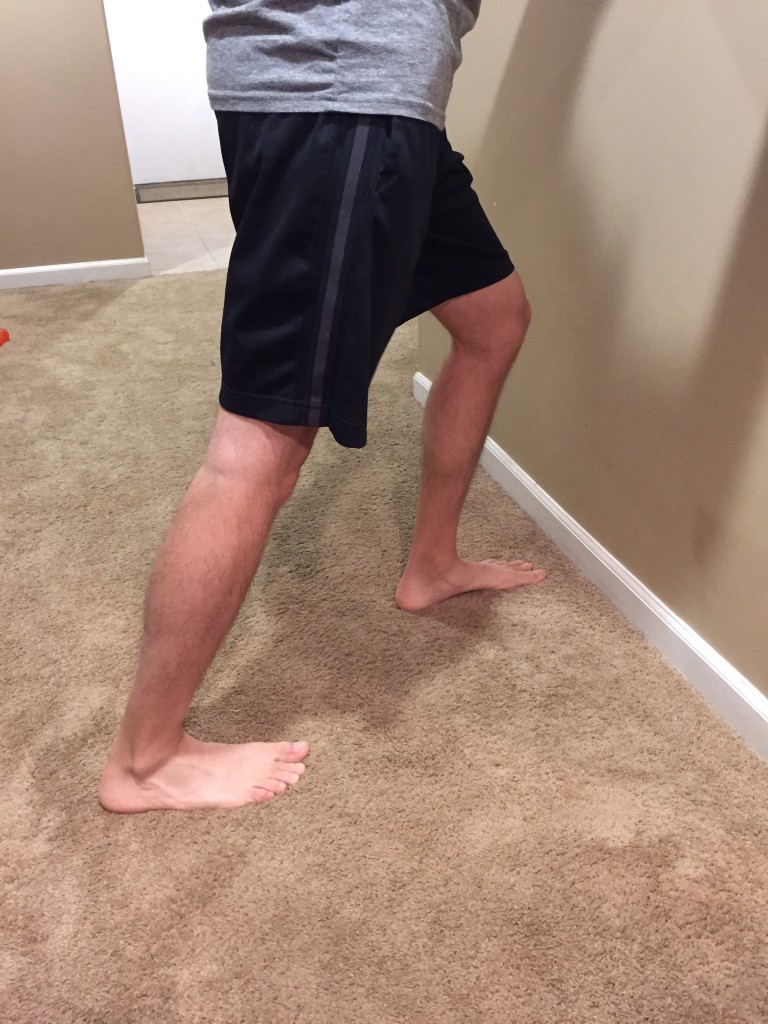 I really like the standing wall lunge because it’s one that you can do practically anywhere. Since it’s so easy to do, this stretch should be done multiple times a day. Standing up every 30 minutes and stretching in the office, in the living room, or between meetings at work can really stretch your calf muscle and heel cord.
Here’s how you should perform the standing wall lunge:
- Place the foot to be stretched behind in the lunge position
- The back leg should be straight and your toes should point forward
- Your front leg should be bent.
- Both feet should be aligned with your knees and your knees aligned with your shoulders.
- With the back leg straight, bend the front knee slightly. Keep your back flat and use the wall for support.
- You should feel a mild stretch in the back foot along your calf and heel tendon.
- Hold this gentle stretch for 30 seconds.
It’s important not to be too forceful. Patience is key here! You will be able to go further eventually so focus on a gentle stretch 5 times throughout your day.
Treatment for Plantar Fasciitis:
3. Proper Strengthening
Exercises for Plantar Fasciitis
The third element of the plantar fasciitis treatment sequence is: strengthening.
The foot has four layers of muscles that work to support the structure and motion of the foot. When these muscles are weak, the mechanics of your foot become compromised.
Regardless of the type of foot you have (supinated, pronated, neutral), your intrinsic muscles should be addressed when treating plantar fasciitis pain.
Some of these exercises will be too difficult to do initially – and that’s OK! It’s normal to progress with your exercises, so don’t get discouraged if you can’t perform these plantar fasciitis exercises right away!
Here’s an idea of how your treatment progression might look:
Week 1-2: Arch Tape, Heel Stretches, Foot Dome Exercise
Week 2-3: Arch Tape, Heel Stretches, Foot Dome + Double Heel Rise
Week 3-4: Heel Stretches, Foot Dome + Double Heel Rise + Single Eccentric Lowering
Week 4-6: Heel Stretches, Foot Dome + Single Eccentric Lowering from Stair
Exercise #1 – Foot Dome Exercise
As you can see from the treatment schedule, the foot dome exercise is included every week. The foot dome exercise is designed to strengthen the intrinsic muscles in the 4 layers of your foot.
Here’s the thing about foot doming: it takes concentration and might not feel like anything at first. That’s completely normal.
It takes 4-6 weeks for any muscle to strengthen at the cellular level – but your muscles can actually improve very quickly in the first 1-2 weeks. This phenomenon is called motor learning and is due to increased firing of your existing muscle cells. You are essentially ‘waking up’ the muscles that haven’t been used in a while.
Eventually these strengthening exercises will increase the size of these muscles – but remember that true strengthening takes 4 to 6 weeks. That’s why it’s so important to include the foot doming exercise early and often.
How to perform:
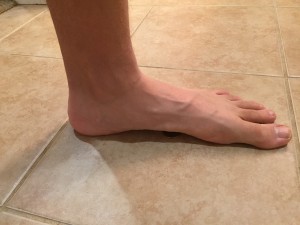 Making a dome with your foot is a very slight motion. The muscles are small and it doesn’t take much motion.
- Place your bare foot on the ground.
- Put a coin under the arch of your foot.
- Gently press your toes towards the floor, lifting the middle of your foot.
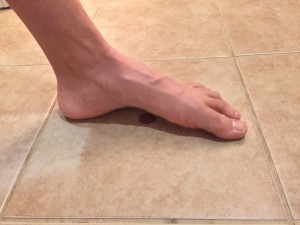
- Try to lift the middle of your foot where the penny is located.
- Don’t scrunch your toes. You should try to keep your toes flat and lift from the middle.
Practicing the Foot Dome
Your goal is to make foot doming a habit in all positions: sitting, standing, walking, etc.
Start with Standing
Can you dome your foot when you’re standing tall? Does it lessen your heel pain?
Every time you stand, think about doming your foot.
Seriously, the foot dome needs to become a part of your daily routine.
If you feel that it’s too much to do, ask yourself this question: would I rather think about heel pain all day or doming my foot all day? Thinking about doming your foot will lead to a stronger foot.
Add the Foot Dome to Walking
You’re going to have to slow down your step at first. Concentrate on keeping a small dome or arch in your foot and make a heel-to-toe step.
It’s probably going to feel strange at first. But strange is better than painful. It takes time to adjust your walking mechanics but it will pay off at the end.
Exercise #2: Double Heel Raise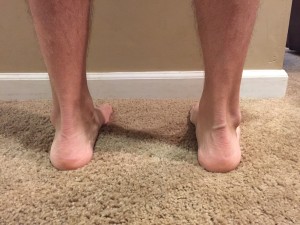
After a week or two of taping, stretching, and foot doming, your plantar fasciitis pain should be noticeably better.
Now’s the time to progress with more strengthening exercises.
The double heel raise is pretty simple: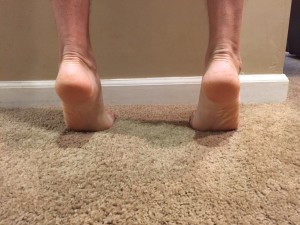
- Feet and knees should be aligned with your hips.
- Rise up on both feet using a countertop as support if you absolutely need it.
- Slowly, slowly, slowly lower down on both feet.
- Perform this exercise 10-15 reps, 1-2 times a day
Exercise #3: Single Eccentric Lowering
The next progression from a double heel rise is to rise up with both feet and lower down on one foot. 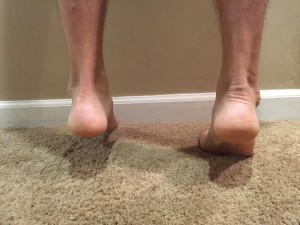 Eccentric lowering is a proven way to strengthen the gastroc muscles and is an important part of the plantar fasciitis protocol. The steps are very similar to the previous exercise:
- Feet and knees should be aligned with your hips.
- Rise up on both feet using a countertop as support if you absolutely need it.
- Slowly, slowly, slowly lower down on one foot.
- Perform this exercise 10-15 reps, 1-2 times a day
Neither of these exercises should be painful. I repeat: These exercises should NOT be painful.
You should feel the muscle working and eventually it will become tired or fatigued. But the exercises and stretches should not bring on a sharp pain.
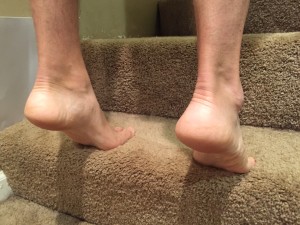
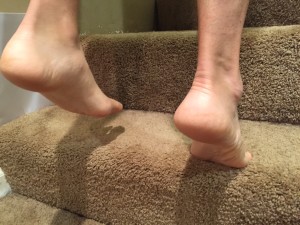
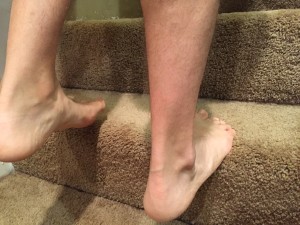
Exercise #4: Single Eccentric Lowering from a Step
When you’ve mastered the single eccentric lowering exercise you can progress to the eccentric lowering from a stair step.
Lowering from a step is much more challenging and should only be done after a few weeks of stretching, foot doming, and double heel rises. You control how far to go based on how it feels. A mild stretch is good – a sharp pain is not.
How Long Does Plantar Fasciitis Last?
It’s not uncommon for people to suffer from plantar fasciitis for months, especially if they haven’t followed a protocol like the one above.
Using the three-part treatment of support, stretching, and strengthening, you should start to see relief of plantar fascia pain within 1-2 weeks.
Remember, your muscles take 4-6 weeks to adapt and strengthen, so it might take a month or two for your heel pain to resolve completely.
True plantar fasciitis should respond to support, stretching, and strengthening. Of course, a physician should examine persistent heel pain to check for other problems such as stress fractures, bone spurs, or tendon strains.
Bottom of Foot Pain Relief with ICE
Ice is one of the best ways to manage pain and inflammation, especially on the bottom of your foot.
Freezing a water bottle and rolling your foot over it can be a quick tool to relieve pain in the bottom of the foot.
 Ice does two things: it helps to relieve inflammation and blocks pain receptors.
Applying ice after a long day of walking or after you experience heel pain with running can be a good way to manage the symptoms of plantar fasciitis.
Just remember, ice doesn’t heal plantar fasciitis. You need to do stretches and exercises to remodel the injured tissues.
If you found these plantar fasciitis tips to be helpful, share it on Pinterest and

This post have 0 komentar
EmoticonEmoticon